Place Image Dialog
Cascade DTP V4
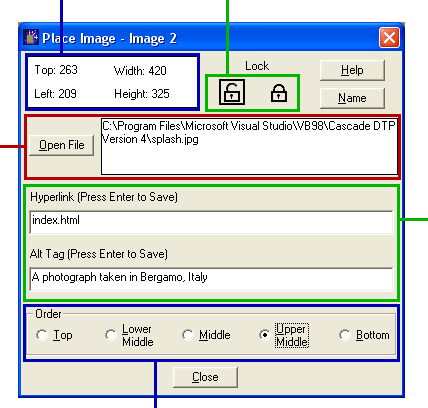
The position and size of the selected image box measured in pixels is displayed here. Click this area to enter the top and left values directly.
You can prevent a selected image box being accidentally moved by clicking the lock symbol [Ctrl + K]. To unlock a selected image box, click the unlock symbol [Ctrl + U].
Click Open File to choose the image that will be placed in the currently selected box. Either GIF (with extension .gif), JPEG (extension .jpg) and PNG (extension .png) files may be selected. Note, however, that png images will not be displayed in the page view - you must use Preview or Box Preview to see these. The width and height of the box will automatically adjust to match the image size. If the picture appears too large or too small, it will be necessary to re-size it in an image editing program.
The Order option button setting determines whether the image will appear underneath or on top of any other text or image box that it overlaps. For example, a box with Order set to Upper Middle will appear on top of a box with Order set to Middle. Note: The page layout within Cascade DTP will not show the effect of the Order settings - to see these you must click Preview on the menu bar [F12] and view the page in your browser.
If the image is to function as a clickable link, the file name and, where necessary, the file path should be entered in Hyperlink. After typing the link details, remember to press Enter while the cursor is still in the box .
Explanatory text that will appear when the mouse is placed over the image should be entered in Alt Tag.